SmallBASIC-PiGPIO - Plugin to use the GPIO pins of a Raspberry Pi
![]()
SmallBASIC-PiGPIO is a plugin for SmallBASIC to use the GPIO connector of a Raspberry Pi. The following article will give you a short introduction to the plugin. Detailed information is available on the project website
Blinking LED
In this example we will connect a LED to the Raspberry Pi and let it blink with a short SmallBASIC program.
Wiring
The wiring of the LED is shown in the following image
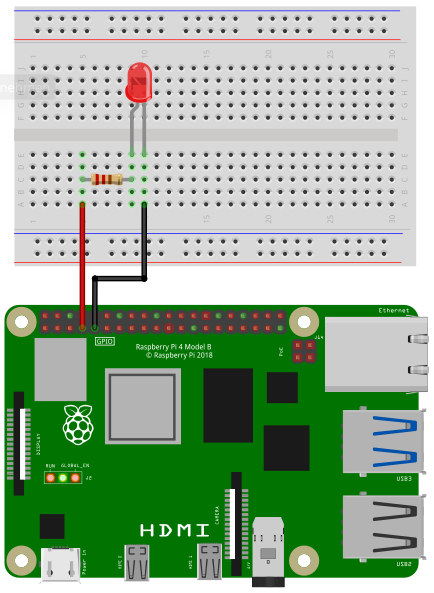
Depending on the type of the LED you need a certain resistor. When using the LED without a resistor, you will destroy the LED and maybe even parts of your Raspberry Pi. If you want to see your LED blinking without studying to much and you don’t expect maximum brightness, then go for a resistor with 220 Ohms or even (saver) 1000 Ohms.
Connect the resistor to pin 7 (GPIO4) and the LED to ground of the Raspberry Pi.
Software
To let the LED blink the following SmallBASIC program can be used.
import gpio

gpio.Open()
gpio.SetOutput(4)

for ii = 1 to 10
  v = !v
  gpio.Write(4, v)
  delay(100)
next

print "done"
The plugin supports Pulse Width Modulation (PWM). Using this technique the intensity of the LED can be tuned as shown in the next example. Connect a LED with a 1 KOhm resistor to pin 12 (PWM0) ’ and pin 6 (GND)
import pwm

' Initialize
pwm.open("pwmchip0")
pwm.Period(1000000)         ' in ns -> 1kHz
pwm.DutyCycle(0)            ' Active time in ns  -> 0 = off
pwm.Enable()                ' enable pwm0

' Fade from dark to bright
for ii = 1 to 1000000 Step 10000
  pwm.DutyCycle(ii)
  delay(10)
next
Push Buttons
Reading the state of a push button is for many Raspberry Pi project important and really easy with SmallBASIC PiGPIO.
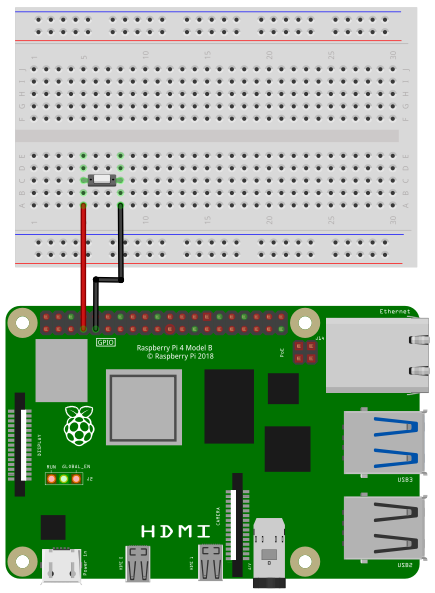
Wiring
In the following image you see the wiring of a push button. When you press the button, the circuit will be closed, otherwise the circuit is open. The button is connected to pin 4 and ground of the Raspberry Pi. An internal pullup resistor will be enabled automatically.
Software
To read the state of the button, the following example program can be used.
import gpio

gpio.Open()
gpio.SetInput(4)

while(1)
  print gpio.Read(4)
  delay(500)
wend
OLED Display
In case the Raspberry Pi is used without a big screen, it would be great to have a small display to print information or even show nice graphics. The plugin supports SSD1306 compatible OLED displays (quite common and really cheap).
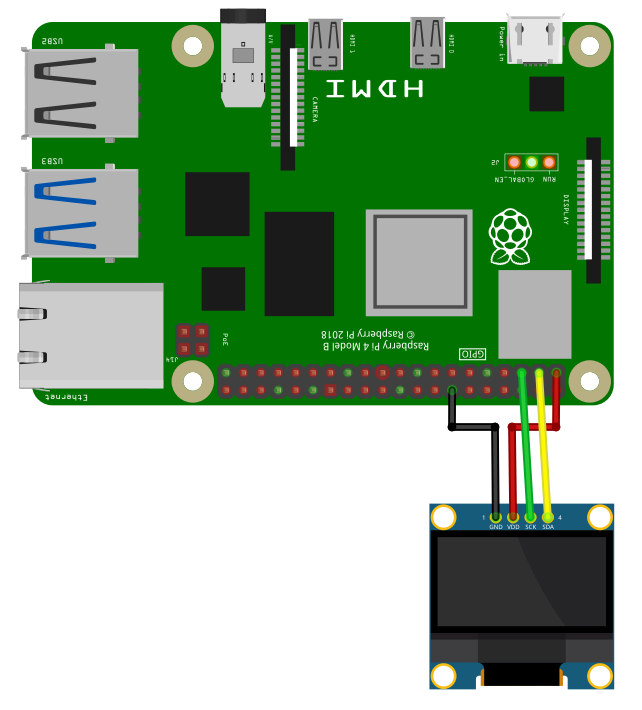
Wiring
For running this example, you need a SSD1306 compatible OLED display. OLEDs with 128x64 or 128x32 pixels are supported. SmallBASIC-PiGPIO is using the I2C-protocol for communication.
Software
The following example shows how to use basic graphic commands to draw lines or print text.
import ssd1306

const ADDRESS = 0x3C

Print "Connect to SSD1306 OLED display"
ssd1306.Open("/dev/i2c-1", ADDRESS)
Print "Connection established"

delay(2000)
ssd1306.Cls()
ssd1306.Circle(25, 40, 16, 1, true)
ssd1306.At(50,5): ssd1306.Print("I2C with", 1)
ssd1306.At(50,14): ssd1306.Print("SMALLBASIC", 1)
ssd1306.line(0, 0, 127, 63)
ssd1306.rect(0,0,127,63)

' Transfer framebuffer to display
s = ticks
ssd1306.Display()
print ticks - s
delay(2000)

' Set brightness
ssd1306.SetBrightness(20)
delay(1000)
ssd1306.SetBrightness(255)
delay(1000)

' Display on/off
ssd1306.DisplayOff()
delay(1000)
ssd1306.DisplayOn()
delay(1000)

' Set inverse
ssd1306.InvertDisplay()
delay(1000)
ssd1306.InvertDisplay()

print "done"